Sunday, October 26, 2008

New pattern & I've been tagged!

Hola amigos! (I feel like Dora the Explorer & Diego whenever I say that, damn Nick Jr.!)
Here's the new pattern, available in the shop:
Baby Seal & his little fishie friend

And now for the tagging part... I'm warning you, it's going to be BORING, because I'm not exciting at all, and I just don't know what to say (I've been avoiding this forever), but I'll try :)
I've been tagged by my favorite wallet maker in the planet: Lyn from florspace (remember this post?)
Here are the rules (which I just copied & pasted from Lyn's blog)
1. Link to your tagger and list these rules on your blog.
2. Share 7 facts about yourself on your blog - some random, some weird.
3. Tag 7 people at the end of your post by leaving their names as well as links to their blog.
4. Let them know they have been tagged by leaving a comment on their blog.
I'm all done with number 1! :)
7 facts about myself...
1. I ADORE Oli & Marti, and can not even imagine what my life would be without them.
2. I only have mate for breakfast (I can't eat in the morning)
3. All my clothes are brown, blue or black, with the exception of 2 red sweaters and a couple of white shirts.
4. I've never owned makeup and I don't even know how to apply it.
5. I've never died my hair, and I'm planning to have a whole head of white hair, which I will neatly arrange in a bun. I'm going to be the cutest grandma! ;)
6. I LOVE Fernando Cabrera, Alfredo Zitarrosa, Mercedes Sosa & Quilapayun, and I listen to them almost every day.
7. It's complicated, but if I could, I would go back home right now.
Done! now consider yourself tagged, & please leave a comment here so we can go read it :)

Wednesday, October 22, 2008

Up for adoption!

I posted new little amigurumi in the shop, hope you like them :)

Monday, October 6, 2008

Gente amiga del otro lado del charco ;)

Perdonen que no conteste antes, pero bueno, aca estoy, tarde pero prometedor ;)
En realidad no se como se puede conseguir el libro en Argentina, y tampoco en Uruguay :(
Si quieren se los puedo vender yo y mandarlo para alla, porque me dijeron que amazon y barnes & noble y tal no los mandan para el Rio de la Plata -que verguenza, che! ;)
Si les interesa dejen un mensaje en este post con su mail, yo les escribo y arreglamos, ta?
Beso!

Sunday, October 5, 2008

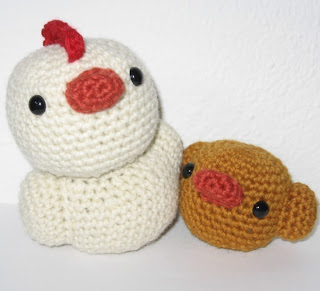
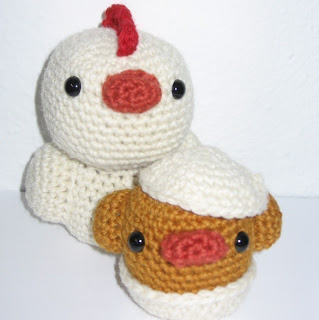
A very chickie crochet pattern ;)

Chickie has been retired from the shop.
A litte late, but here it is :)
Un poquito tarde pero aca esta!

Materials you will need:
Little amounts of worsted weight yarn in yellow, orange, red and white.
9 mm plastic eyes with safety backings.
Size G/6 (4mm) crochet hook.
Fiberfill or stuffing of your choice.
When I made them, dad ended up being approx. 4 inches/10 cm tall, baby approx. 2 inches/5 cm. Depending on your tension and the yarn you use, they might end up being a little bit smaller or a little bit bigger

DAD

Beak
R1: Ch 2, 5 sc in second ch from hook.
R2: 2 sc in each sc around. (10 sts)
R3-4: Sc 10.
Bind off leaving long tail for sewing

Head
R1: Ch 2, 7 sc in second ch from hook.
R2: 2 sc in each sc around. (14 sts)
R3: *Sc 1, 2 sc in next sc*, repeat 7 times. (21 sts)
R4: *Sc 2, 2 sc in next sc*, repeat 7 times. (28 sts)
R5: *Sc 3, 2 sc in next sc*, repeat 7 times. (35 sts)
R6-16: Sc 35.
R17: *Sc 3, dec 1*, repeat 7 times. (28 sts)
R18: *Sc 2, dec 1*, repeat 7 times. (21 sts)
Work on face – sew beak to head and position and attach plastic eyes.
R19: *Sc 1, dec 1*, repeat 7 times. (14 sts)
Stuff head.
R20: *Sk 1 sc, sc 1*, repeat 7 times. (7 sts)
Bind off, leaving long tail for closing up little hole, weave in loose end.

Crest
Using red:
R1: Loosely chain 11, 3 dc in third chain from hook, sk 1, sl st 1, *3 dc in next st, sk 1, sl st 1*, repeat 2 times.
Bind off, leaving long tail for sewing, sew to top of head.

Body
R1: Ch 2, 7 sc in second ch from hook.
R2: 2 sc in each sc around. (14 sts)
R3: *Sc 1, 2 sc in next sc*, repeat 7 times. (21 sts)
R4: *Sc 2, 2 sc in next sc*, repeat 7 times. (28 sts)
R5: *Sc 3, 2 sc in next sc*, repeat 7 times. (35 sts)
R6-12: Sc 35.
R13: *Sc 3, dec 1*, repeat 7 times. (28 sts)
R14: Sc 28.
R15: *Sc 2, dec 1*, repeat 7 times. (21 sts)
R16; Sc 21.
Bind off, leaving long tail for sewing, stuff and sew to head.

Wings (make 2)
R1: Ch 2, 7 sc in second chain from hook.
R2: 2 sc in each sc around. (14 sts)
R3: *Sc 1, 2 sc in next sc*, repeat 7 times. (21 sts)
R4-6: Sc 21.
Bind off, leaving long tail for sewing, stuff and sew to body.

BABY

Beak
Repeat dad’s beak instructions :)

Head/Body
R1: Ch 2, 7 sc in second chain from hook.
R2: 2 sc in each sc around. (14 sts)
R3: *Sc 1, 2 sc in next sc*, repeat 7 times. (21 sts)
R4: *Sc 2, 2 sc in next sc*, repeat 7 times. (28 sts)
R5-13: Sc 28.
R14: *Sc 2, dec 1*, repeat 7 times. (21 sts)
Work on face – sew beak to head, position and attach plastic eyes with safety backings.
R15: Sc 21.
R16: *Sc 1, dec 1*, repeat 7 times. (14 sts)
Stuff
R17: *Sk 1 sc, sc 1*, repeat 7 times. (7 sts)
Bind off, leaving long tail to close hole, weave in loose end.

Wings
R1: Ch 2, 7 sc in second chain from hook.
R2: 2 sc in each sc. (14 sts)
R3-5: Sc 14.
Bind off leaving long tail for sewing, stuff and sew to body.

Egg Shell
R1: Ch 2, 7 sc in second chain from hook.
R2: 2 sc in each sc around. (14 sts)
R3: *Sc 1, 2 sc in next sc*, repeat 7 times. (21 sts)
R4: *Sc 2, 2 sc in next sc*, repeat 7 times. (28 sts)
Bottom:
R5-8: Sc 28.
Bind off, weave in loose ends.
Top:
R5-6: Sc 28.
Bind off, weave in loose ends.

Friday, October 3, 2008

How to add hair to your amigurumi

This is how I add hair to my ami dolls, I hope it helps! Please write if you have questions and I'll add the answers to this post.
**I'll post the little pattern tomorrow, and Amigurumi 2 is coming in September 2009 :)**

I give hair to my amigurumi dollies as you would if putting tassels in a scarf: I cut a piece of yarn which is double the length that I want the hair to be, I fold it in half and put the loopy end through a stitch in the top of the head, starting in the front of the head, where I want the part to be. I then put the end pieces through the loop and pull so they are right next to the head. Repeat to form a vertical line right in the middle of the head (or where you want the part to be).
Once I’m done with one side of the part I do the other side, making sure to put the second row of hair right next to the first one:


After I’m done with the middle part, I move one of the middle parts all the way to the other side (see the first of the pics that follow) to work on the hair underneath the part (I hope this makes sense!):

I then do the same thing over and over so the whole head is covered by hair! I usually draw an imaginary line from ear to ear and put hair on the upper part of the line.
Pronto!
ps: new "Bed Time" pattern posted in the shop :)
Related Posts with Thumbnails